A Complete Professional Guide to Upgrading Your Circuit Breaker with Advanced Safety Features
Are you tired of fumbling in the dark trying to find the right circuit breaker to reset? Concerned about your circuit breaker’s reliability and safety features? It might be time to consider upgrading to a more advanced circuit breaker that features a convenient test button and enhanced protection capabilities.
Modern circuit breakers with test buttons—such as GFCI (Ground Fault Circuit Interrupter) and AFCI (Arc Fault Circuit Interrupter) breakers—offer superior safety features that can prevent electrical fires, protect against electric shock, and make troubleshooting significantly easier. This comprehensive guide will walk you through the entire process of replacing your circuit breaker, from understanding the benefits to completing the installation safely.
Important Note: This guide is for educational purposes. Circuit breaker replacement involves working with high-voltage electricity and should only be performed by licensed electricians in most jurisdictions. Improper installation can result in serious injury, death, or fire hazards.
Understanding Circuit Breakers and Test Buttons
Circuit breakers are essential safety devices that protect your electrical system from overloads and short circuits. When an electrical fault occurs, the circuit breaker quickly shuts off the flow of electricity, preventing potential fires or damage to your appliances and equipment.
How Circuit Breakers Work
Traditional circuit breakers use two primary protection mechanisms:
Thermal Protection
A bimetallic strip heats up when current exceeds safe limits, bending and triggering the trip mechanism. Responds to overload conditions.
Magnetic Protection
An electromagnetic coil generates a magnetic field during short circuits, instantly tripping the breaker to prevent damage and fire.
What is a Test Button?
The test button is a safety feature found on advanced circuit breakers that allows you to manually verify the breaker’s protection mechanisms are functioning correctly. When pressed, it simulates a fault condition to ensure the breaker will trip when needed.
Test Button Benefits:
- Allows monthly safety verification
- Confirms protection circuitry is operational
- Required by code on GFCI and AFCI breakers
- Provides peace of mind for electrical safety
Why Upgrade to a Circuit Breaker with Test Button?
Upgrading from a traditional circuit breaker to one with a test button offers numerous advantages that enhance both safety and convenience:
Key Advantages of Modern Circuit Breakers
1. Enhanced Safety Features
- GFCI Protection: Prevents electric shock by detecting ground faults
- AFCI Protection: Prevents electrical fires by detecting dangerous arcing
- Combination Protection: Some breakers offer both GFCI and AFCI in one unit
- Faster Response: Advanced electronics respond in milliseconds
2. Easy Identification
- Built-in indicator lights show trip status
- Clear visual identification of faulty circuits
- No more trial-and-error in dark panels
- Color-coded status indicators on some models
3. Convenient Testing
- Monthly self-testing with the push of a button
- Verify protection without specialized equipment
- Meets NEC testing requirements easily
- Quick confirmation of proper operation
4. Code Compliance
- Required in specific locations by NEC
- Bathrooms, kitchens, outdoor areas need GFCI
- Bedrooms and living areas need AFCI (newer homes)
- Ensures your home meets current safety standards
When Upgrading is Required by Code
| Location/Circuit | Required Protection | Rationale |
|---|---|---|
| Bathrooms | GFCI | Water proximity creates shock hazard |
| Kitchen Countertops | GFCI | Water and electricity combination risk |
| Outdoor Outlets | GFCI | Moisture and weather exposure |
| Garages | GFCI | Concrete floors and potential moisture |
| Basements (Unfinished) | GFCI | Moisture and grounding concerns |
| Bedrooms | AFCI | Fire prevention from damaged cords/wiring |
| Living Areas | AFCI (newer construction) | Comprehensive fire protection |
Upgrade to Modern Circuit Protection
Explore DVOLT’s range of advanced circuit breakers with test buttons and enhanced safety features
Browse Circuit Breakers →Types of Circuit Breakers with Test Buttons
Understanding the different types of circuit breakers with test buttons helps you choose the right replacement:
Main Types of Test Button Breakers
GFCI Circuit Breaker
Function
Detects ground faults (current leakage to ground) and trips within 25-40 milliseconds to prevent electric shock.
Best For
- Bathrooms and kitchens
- Outdoor outlets
- Wet locations
- Areas near water sources
Features
- Test and reset buttons
- Trips at 4-6 mA leakage
- LED trip indicator (some models)
AFCI Circuit Breaker
Function
Detects dangerous electrical arcing that can cause fires and immediately interrupts the circuit.
Best For
- Bedrooms (required)
- Living rooms
- Family rooms
- Dining rooms
Features
- Test button required
- Detects series and parallel arcs
- Prevents fire from damaged wiring
Dual Function (GFCI/AFCI)
Function
Combines both GFCI and AFCI protection in a single breaker for comprehensive safety.
Best For
- Kitchen circuits
- Laundry rooms
- Any location needing both protections
- Simplified panel installation
Features
- Test button for both functions
- Space-saving single-breaker solution
- Comprehensive protection
Smart Circuit Breakers
Function
Wi-Fi or Bluetooth-enabled breakers with remote monitoring, control, and energy tracking capabilities.
Best For
- Smart home integration
- Remote monitoring
- Energy management
- Vacation homes
Features
- App-based control
- Usage monitoring
- Remote on/off
- Notifications and alerts
DIY vs. Professional Installation: What You Need to Know
CRITICAL SAFETY WARNING
Circuit breaker replacement involves working with potentially lethal voltage levels. This guide is for educational purposes only.
- Most jurisdictions require licensed electricians for panel work
- Permits are typically required for circuit breaker replacement
- Insurance may not cover DIY electrical work
- Improper installation can cause fires, injuries, or death
- Even with the main breaker off, some parts remain energized
When Professional Installation is REQUIRED
You must hire a licensed electrician if:
- Local code requires it (most jurisdictions)
- You’re not experienced with electrical work
- The main breaker cannot be shut off safely
- You’re uncomfortable working in the panel
- Your panel has aluminum wiring
- The panel is old, damaged, or outdated
- You need to upgrade panel capacity
- Multiple breakers need replacement
Costs of Professional vs. DIY
| Approach | Typical Cost | Pros | Cons |
|---|---|---|---|
| DIY | $30-$150 (breaker cost only) | Lower cost, immediate completion | Safety risks, no permit, insurance issues, legal concerns |
| Licensed Electrician | $150-$400 (labor + breaker) | Safe, code-compliant, permitted, insured, warranty | Higher cost, scheduling required |
Recommendation: The small cost difference between DIY and professional installation is insignificant compared to the risks involved. Professional installation ensures safety, code compliance, proper permitting, and insurance coverage. The peace of mind is invaluable.
Tools and Materials Required
If you’re a licensed electrician or performing this work under professional supervision, here are the tools and materials needed:
Essential Tools
- Non-contact voltage tester: To verify circuits are de-energized
- Multimeter: For precise voltage testing
- Insulated screwdrivers: Flathead and Phillips, rated for electrical work
- Wire strippers: For preparing wire connections
- Needle-nose pliers: For wire manipulation
- Flashlight or headlamp: For adequate lighting
- Camera or smartphone: To document wiring before removal
Safety Equipment
- Insulated electrical gloves: Rated for your panel voltage
- Safety glasses: With side shields
- Face shield: For arc flash protection
- Rubber-soled shoes: Non-conductive footwear
- Rubber mat: To stand on if floor is concrete
- Fire extinguisher (Class C): For electrical fires
Materials Needed
- New circuit breaker: Compatible with your panel (verify manufacturer and model)
- Wire labels: For marking circuits
- Electrical tape: For securing connections
- Wire nuts: If pigtails are needed
- Panel labels: To identify the new circuit
Critical Safety Precautions
Working inside an electrical panel is extremely dangerous. Follow these essential safety precautions:
LIFE-THREATENING HAZARDS
- Main bus bars remain live: Even with main breaker off, incoming power lines are still energized at the top of the panel
- Arc flash risk: Short circuits can cause explosive arc flash reaching 35,000°F
- Electrocution: Contact with live parts can be instantly fatal
- Hidden energized parts: Multiple power sources may be present
Mandatory Safety Steps
-
Shut Off Main Power
Turn off the main breaker to de-energize branch circuits. Note: The main bus bars and service entrance will still be live.
-
Test for Voltage
Use a non-contact voltage tester to verify circuits are de-energized before touching anything.
-
Work in Dry Conditions
Never work on electrical panels in wet conditions or with wet hands. Ensure the area is completely dry.
-
Use Proper PPE
Wear insulated gloves, safety glasses, face shield, and rubber-soled shoes. Remove all jewelry.
-
Keep One Hand Free
When working near energized parts, keep one hand in your pocket or behind your back to prevent current path through your heart.
-
Have Help Available
Never work alone. Have someone nearby who can call emergency services if needed.
-
Know CPR
Ensure someone present knows CPR in case of electric shock emergency.
Ensuring Compatibility
Not all circuit breakers are universal. Compatibility is critical for safe operation:
Compatibility Checklist
1. Panel Manufacturer
Circuit breakers must match your panel’s brand:
- Square D breakers → Square D panels
- Siemens breakers → Siemens panels
- GE breakers → GE panels
- Cutler-Hammer → Eaton panels
Note: Some aftermarket breakers claim compatibility but may not be UL-listed for your specific panel.
2. Physical Size
Breakers come in different widths:
- Single-pole: Takes one slot
- Double-pole: Takes two slots
- GFCI/AFCI: May take more space (thicker)
Ensure your panel has adequate space.
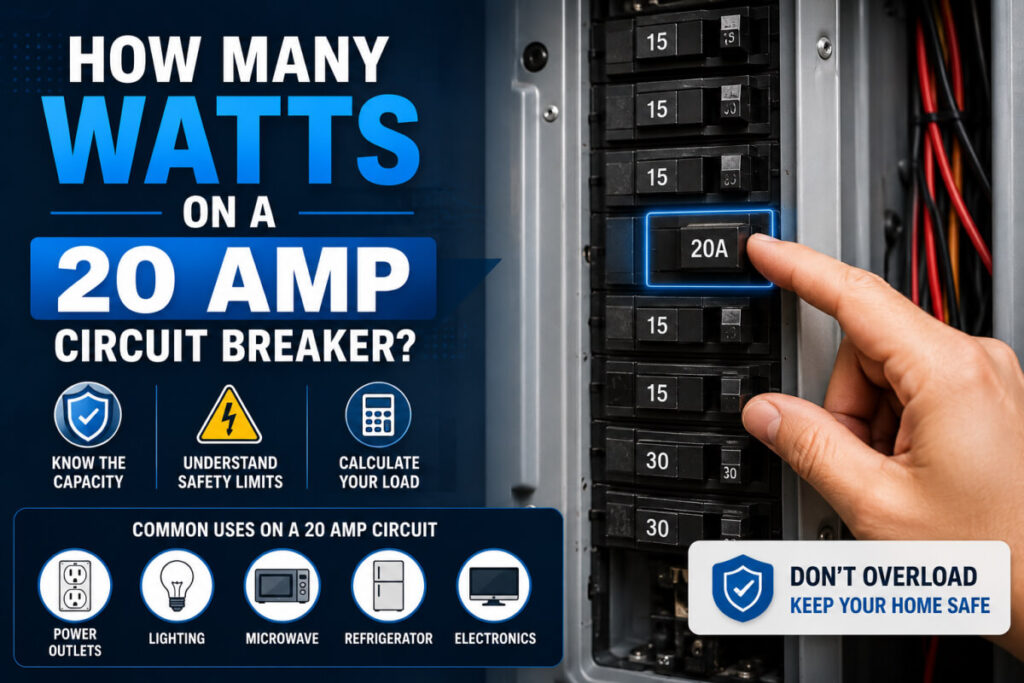
3. Amperage Rating
Match the existing breaker’s amp rating:
- Common ratings: 15A, 20A, 30A, 40A, 50A
- Must match wire gauge
- Cannot upsize without upgrading wiring
4. Voltage Rating
Ensure voltage compatibility:
- 120V for single-pole circuits
- 240V for double-pole circuits
- 120/240V for dual-voltage
Step-by-Step Replacement Procedure
-
Document the Current Setup
Before doing anything:
- Photograph the panel layout and wiring
- Note which breaker you’re replacing (position number)
- Record the circuit it controls (from panel schedule)
- Verify the amperage rating of the old breaker
- Check wire connections and colors
-
Notify Household Members
Inform everyone that power will be shut off:
- Save work on computers
- Unplug sensitive electronics
- Prepare for HVAC shutdown
- Have flashlights ready
-
Shut Off the Main Breaker
Turn the main breaker to the OFF position to de-energize branch circuit breakers.
Critical: The main bus bars and service entrance cables remain energized even with the main breaker off. Do not touch these areas. -
Verify Power is Off
Before touching anything:
- Use a non-contact voltage tester on the breaker you’re replacing
- Test adjacent breakers to verify tester is working
- Confirm the specific circuit is de-energized
- Test again immediately before touching wires
-
Remove the Panel Cover (If Necessary)
Most breaker replacements don’t require removing the dead front cover. Only remove it if you cannot access breaker mounting:
- Unscrew panel cover screws
- Carefully lift cover away
- Be extremely careful not to touch bus bars
Extreme Caution: With the dead front removed, exposed bus bars are visible and remain energized. One mistake can be fatal. -
Turn Off the Old Breaker
Move the breaker handle to the full OFF position before removal.
-
Disconnect the Wire(s)
Carefully disconnect wires from the old breaker:
- Loosen terminal screws completely
- Gently pull wires free from terminals
- For double-pole breakers, disconnect both wires
- Note wire positions and colors
- Inspect wires for damage
Wire Color Code:
- Black or red = Hot wires (connect to breaker)
- White = Neutral (connects to neutral bus for GFCI)
- Bare or green = Ground (connects to ground bus)
-
Remove the Old Breaker
Circuit breakers typically mount with a clip mechanism:
- Pull the breaker away from the bus bar connection
- Lift the opposite end up and out of the mounting clip
- Some breakers require pressing a release tab
- Set the old breaker aside
-
Inspect the Panel
Before installing the new breaker:
- Check the bus bar connection point for corrosion or damage
- Ensure mounting clips are intact
- Look for signs of overheating or burning
- Verify adequate space for the new breaker
-
Install the New Circuit Breaker
Install the new breaker in reverse order of removal:
- Ensure breaker is in the OFF position
- Align breaker with mounting slot
- Hook one end into the mounting clip
- Push the opposite end firmly onto the bus bar until it clicks
- Verify the breaker is fully seated and secure
-
Connect the Wires
Connect wires to the new breaker terminals:
For Standard Single/Double-Pole Breakers:
- Insert hot wire(s) into breaker terminal(s)
- Tighten terminal screws firmly (don’t overtighten)
- Tug gently on wires to verify connection
For GFCI/AFCI Breakers (Additional Connections):
- Connect hot wire to “LINE” or “LOAD” terminal per instructions
- Connect neutral (white) wire to breaker’s neutral terminal
- Connect neutral pigtail from breaker to panel neutral bus
- Ensure ground wire goes to ground bus (not to breaker)
Critical for GFCI/AFCI: These breakers have specific wiring requirements. Consult the manufacturer’s instructions included with the breaker. Incorrect wiring will prevent proper operation. -
Verify All Connections
Double-check your work:
- All terminal screws are tight
- Wires are not pinched or damaged
- Neutral pigtail is connected (GFCI/AFCI)
- No bare wire is exposed
- Breaker is fully seated on bus bar
-
Replace Panel Cover
If you removed the dead front cover, replace it now:
- Carefully align cover over breakers
- Ensure no wires are pinched
- Secure with all screws
-
Update Panel Schedule
Label the new breaker clearly:
- Update the panel directory/schedule
- Mark if it’s GFCI or AFCI protected
- Note the circuit it controls
- Record the date of replacement
Quality Replacement Circuit Breakers
Professional-grade circuit breakers from trusted manufacturers
Testing Your New Circuit Breaker
After installation, thorough testing ensures everything is working correctly:
-
Visual Inspection
Before restoring power:
- Breaker is fully seated in the panel
- All connections are tight
- No exposed bare wires
- Panel cover is properly secured
-
Turn On Main Breaker
Restore power to the panel by switching the main breaker to ON.
-
Turn On New Breaker
Switch the new circuit breaker to the ON position. It should latch firmly in place.
-
Verify Power to Circuit
Check that power is flowing to the circuit:
- Test outlets with a voltage tester or plug-in device
- Turn on lights controlled by the circuit
- Check that appliances have power
- Verify proper voltage with multimeter (120V or 240V)
-
Test the Test Button (GFCI/AFCI)
For breakers with test buttons:
- Press the test button firmly
- Breaker should trip immediately
- Power should be cut to the circuit
- Indicator light should show trip status (if equipped)
Successful Test: If the breaker trips when you press the test button, the protection mechanism is working correctly. -
Reset the Breaker
After successful test:
- Push breaker to full OFF position first
- Then push to ON position
- Breaker should latch firmly
- Power should restore to circuit
-
Load Testing
Test under normal operating conditions:
- Turn on typical loads for the circuit
- Run appliances normally for 30 minutes
- Breaker should remain ON without tripping
- Check that breaker doesn’t feel excessively hot
-
Document the Installation
Record important information:
- Date of installation
- Breaker model and serial number
- Test results
- Any observations or notes
- Next scheduled test date
Common Issues and Troubleshooting
If you encounter problems after installation:
| Problem | Possible Cause | Solution |
|---|---|---|
| Breaker won’t stay ON | Actual fault on circuit, breaker not fully seated, incompatible breaker | Check circuit for faults, verify breaker is properly installed, confirm compatibility |
| No power to circuit | Loose wire connections, breaker not on bus bar, incorrect wiring | Verify all connections are tight, ensure breaker clicked onto bus bar, check wiring |
| Test button doesn’t trip breaker | Defective breaker, incorrect neutral connection (GFCI) | Replace breaker, verify neutral pigtail connection |
| Breaker immediately re-trips | Ground fault, arc fault, short circuit, overload | Disconnect loads one by one to isolate fault, check for damaged wiring |
| Breaker feels hot | Loose connections, overloaded circuit, undersized breaker | Turn off immediately, check connections, verify proper sizing |
| Won’t fit in panel | Wrong breaker type, insufficient space, incompatible model | Verify correct breaker for panel, check space requirements, confirm compatibility |
When to Call an Electrician Immediately
- Breaker won’t stay on after multiple reset attempts
- Burning smell from panel or breaker
- Sparking or arcing observed
- Breaker feels excessively hot
- Unusual sounds (buzzing, crackling) from panel
- Test button doesn’t work on new GFCI/AFCI breaker
- Any uncertainty about the installation
Frequently Asked Questions
Q1. Can I replace my circuit breaker myself, or should I hire a professional?
While some jurisdictions may allow homeowner electrical work, circuit breaker replacement involves working with potentially lethal voltage and typically requires a licensed electrician. Most areas require permits and inspections. Professional installation ensures safety, code compliance, and proper operation. The cost difference is minimal compared to the risks of DIY installation.
Q2. Are circuit breakers with test buttons compatible with all electrical panels?
No. Circuit breaker compatibility depends on the panel manufacturer, model, and design. You must use breakers specifically designed for and UL-listed with your exact panel model. Never substitute different brands or use “universal” breakers—this violates codes and creates serious safety hazards.
Q3. How do I know which type of breaker I need—GFCI, AFCI, or standard?
This depends on the circuit location and local electrical codes. GFCI breakers are required in wet locations (bathrooms, kitchens, outdoors). AFCI breakers are required in living spaces (bedrooms, living rooms) in newer construction. Consult local codes or an electrician to determine requirements for your specific situation.
Q4. What if my new breaker won’t fit in my panel?
GFCI and AFCI breakers are often thicker than standard breakers and may not fit in all panel spaces. You may need to rearrange breakers or use a different mounting position. Some panels have limited space for wide breakers. Verify dimensions and compatibility before purchasing. In some cases, you may need a panel upgrade.
Q5. How much does it cost to replace a circuit breaker?
Professional replacement typically costs $150-$400, including labor and the breaker. Standard breakers cost $5-$50, GFCI breakers $40-$100, and AFCI breakers $30-$80. Smart breakers can cost $50-$150+. Prices vary by location, electrician rates, and whether permits are needed. Additional costs may apply for panel modifications or upgrades.
Q6. Can I upgrade from a standard breaker to a GFCI or AFCI breaker?
Yes, this is a common upgrade to improve safety or meet current codes. However, you must ensure: (1) the new breaker is compatible with your panel, (2) there’s adequate space, (3) neutral wiring is available for GFCI/AFCI connection, and (4) the upgrade meets code requirements. Consult an electrician for proper implementation.
Q7. Why does my new GFCI breaker keep tripping?
Common causes include: actual ground faults on the circuit, moisture in outlets or wiring, damaged appliances, incorrect wiring (reversed neutral), or nuisance tripping from normal electrical noise. Systematically disconnect devices to isolate the problem. If tripping persists with nothing connected, check the breaker wiring or consult an electrician.
Q8. Do I need to turn off the main breaker to replace a circuit breaker?
Yes, absolutely. The main breaker should always be turned off before working on any branch circuit breaker. However, be aware that even with the main breaker off, the main bus bars and service entrance cables remain energized—these should never be touched.
Q9. What’s the difference between a circuit breaker and a fuse?
Circuit breakers are reusable protection devices that can be reset after tripping. Fuses are one-time-use devices that must be replaced after blowing. Circuit breakers offer better convenience, faster restoration, easier troubleshooting, and more precise protection. Most modern homes use circuit breakers exclusively.
Q10. How long do circuit breakers last?
Quality circuit breakers typically last 20-30 years with normal use. However, they should be replaced if: they fail testing, trip frequently without cause, show signs of damage or overheating, have been subjected to severe fault conditions, or are involved in panel upgrades. Regular testing helps identify breakers that need replacement.
Conclusion
Upgrading to a circuit breaker with a test button provides numerous benefits, including enhanced safety features, easier troubleshooting, and compliance with modern electrical codes. While this guide has provided comprehensive information about the replacement process, it’s crucial to remember that electrical panel work involves serious safety risks.
Final Recommendations:
- Hire a licensed electrician for all circuit breaker replacements
- Ensure proper permits and inspections are obtained
- Use only manufacturer-approved breakers for your specific panel
- Test GFCI/AFCI breakers monthly using the test button
- Document all electrical work for future reference
- Never compromise on safety to save money
- Keep your electrical panel schedule updated
By prioritizing safety, using quality components, and ensuring professional installation, you can enhance the protection and reliability of your electrical system for years to come.
Trust DVOLT for Quality Electrical Components
Professional-grade circuit breakers and electrical protection devices for safe, reliable installations
Electrical safety is no accident—it’s the result of proper planning, quality components, and professional installation. DVOLT Electric—your partner in electrical safety.