Testing a Breaker With and Without a Multimeter — Continuity, Resistance, and What the Results Mean
When a circuit goes dead and you’re not sure whether the problem is the breaker itself or something downstream in the wiring, knowing how to test a circuit breaker correctly turns a guessing game into a clear diagnosis. The right method depends on whether you want to test the breaker inside a live panel or remove it and test without power — and both approaches give you different, useful information.
This guide covers how to test a circuit breaker without power using a continuity test, how to test a breaker with a multimeter under live conditions, how to check if a circuit breaker is bad or partially failed, and what the results actually mean.
Why Test a Circuit Breaker?
A breaker that looks fine from the outside — handle in the ON position, no visible damage — can still have a failed internal contact or degraded trip mechanism. Testing confirms whether the breaker is conducting before you spend time tracing wiring faults that don’t exist.
The two most common failure modes worth testing for are a failed contact (breaker appears ON but passes no current) and a tripped breaker whose handle hasn’t shifted far enough to be visibly in the middle position.
Method 1: How to Test a Circuit Breaker Without Power (Continuity Test)
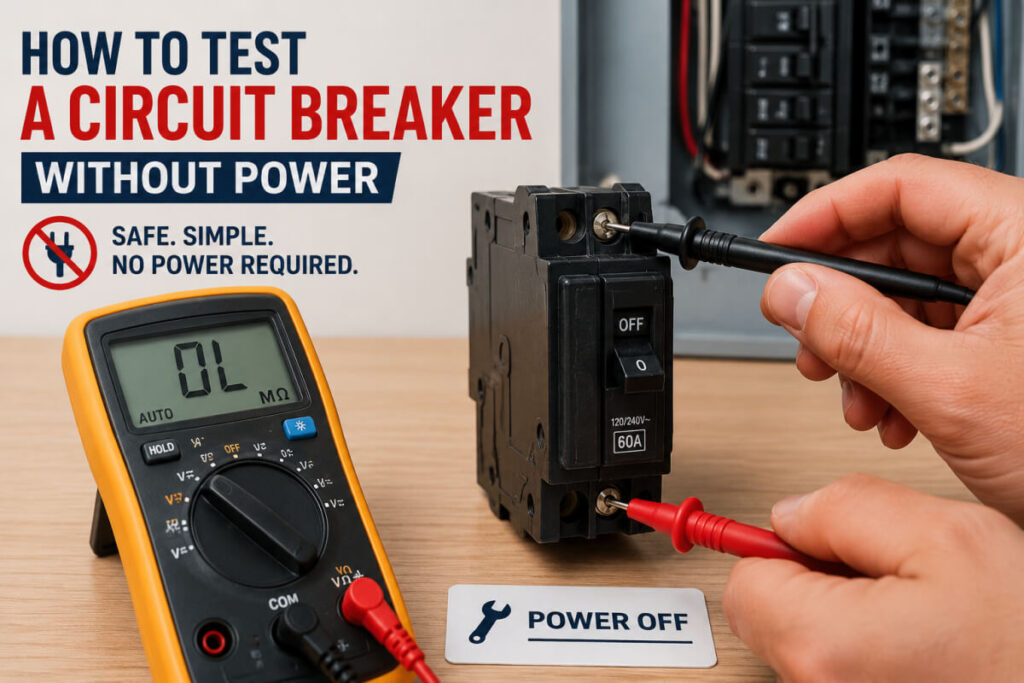
No Power RequiredTesting a breaker without power — either after removing it from the panel or in an unpowered panel — uses the continuity function on a multimeter. This method confirms whether the breaker’s internal contact is capable of passing current, independently of the live circuit.
What you need: A digital multimeter with a continuity mode (audible beep when resistance is near zero) or an ohms/resistance setting.
- Cut power and open the panel. If testing in-panel, turn off the main breaker to de-energize the branch breakers. Open the panel door safely — note the main bus bars remain live even with the main breaker off. If testing a removed breaker, no power is needed at all.
- Set the multimeter to continuity mode or ohms. The continuity symbol typically looks like a sound-wave arc or a diode arrow. In this mode the meter beeps when resistance is near zero.
- Switch the breaker handle to the ON position.
- Place the probes. Touch the red probe to the breaker’s load terminal (the screw where the circuit wire connects) and the black probe to the line contact — the metal contact on the back of the breaker that clips onto the bus bar.
- Read the result.
- Continuity / near-zero ohms with breaker ON: Internal contact is intact. The breaker can pass current. If the circuit is dead under power, the fault is downstream.
- No continuity / infinite resistance with breaker ON: Internal contact has failed open — confirmed bad breaker. Replace it.
- Switch breaker to OFF and retest. A good breaker now shows no continuity. Continuity in both ON and OFF positions means the contact is stuck closed — the breaker can no longer interrupt the circuit, which also requires immediate replacement.
- Test in the tripped (middle) position if applicable. A correctly tripped breaker reads no continuity — the contact is open as intended.
Method 2: How to Test a Circuit Breaker with a Multimeter (Live Voltage Test)
Live PanelTesting a breaker in a live panel gives you a direct voltage reading that confirms whether it’s delivering power to the circuit.
- Confirm the breaker is ON and open the panel door.
- Set the multimeter to AC voltage — 120V range for a single-pole breaker; 240V for a double-pole.
- Place the probes. Touch the red probe to the breaker’s output terminal (where the black circuit wire connects) and the black probe to the neutral bar.
- Read the voltage.
- A functioning single-pole breaker reads approximately 120V. A double-pole reads 120V from each output terminal to neutral, and ~240V across both terminals.
- 0V with the breaker ON = confirmed failed internal contact. Bad breaker — replace it.
- Correct voltage, circuit still dead = breaker is fine. Fault is downstream in wiring or a device.
- Test under load if behavior is intermittent. Turn on devices on the circuit and recheck the voltage. A high-resistance internal contact may read correctly with no load but drop significantly under current draw — a sign of a partially failing breaker that keeps tripping under load.
How to Test a Circuit Breaker Without a Multimeter
Without a multimeter, you can confirm whether a circuit is live or dead using a plug-in outlet tester or a lamp with a known-good bulb. Plug it into an outlet on the suspect circuit and attempt a correct reset — fully to OFF, then firmly to ON. If the circuit remains dead, the breaker is likely at fault or there’s a downstream wiring issue.
This method confirms a dead circuit but cannot distinguish between a failed breaker and a downstream wiring fault. Only the multimeter tests above can make that distinction definitively. If you need to test more accurately but don’t yet have a multimeter, understand what the full replacement process involves before pulling a breaker without a confirmed test result.
Reading the Results: What Each Outcome Means
🔴 Bad Breaker Confirmed
No continuity with breaker ON (continuity test), or 0V at the output terminal with breaker ON (voltage test). Replace the breaker.
🟢 Good Breaker — Downstream Fault
Full continuity with breaker ON, or correct voltage at output — but circuit is still dead. Fault is in the wiring, outlet, or a connected device.
🟠 Stuck Closed Contact
Continuity in both ON and OFF positions. The breaker cannot interrupt the circuit. Replace immediately — this is a safety failure.
🟡 Weak Internal Contact
Voltage reads correctly under no load but drops significantly under current. Partially failed — needs replacement before complete failure.
Common Mistakes When Testing a Circuit Breaker
- Not resetting the breaker correctly first: A tripped breaker must be pushed fully to OFF before it can move to ON — a breaker that won’t reset correctly after this sequence has a separate problem worth diagnosing before testing for contact failure.
- Touching probes to bus bars instead of breaker terminals when working in a live panel — the bus bars are always energized from the utility.
- Concluding the breaker is good based only on the handle position — position alone is not a reliable indicator of whether the internal contact is functioning.
- Skipping the OFF-position continuity check — confirming the breaker can interrupt current is as important as confirming it can pass current.
Frequently Asked Questions
How Do I Test a Circuit Breaker Without Power?
Use a multimeter in continuity mode. Switch the breaker to ON, touch the probes to the load terminal and the line contact. Continuity confirms the internal contact is intact. No continuity with the breaker ON confirms the breaker has failed open and needs replacement.
What Does No Continuity on a Breaker Mean?
If the breaker is in the ON position and shows no continuity (infinite resistance on the ohms setting), the internal contact has failed open. The breaker is confirmed bad and needs to be replaced.
Can I Test a Breaker Without a Multimeter?
You can confirm whether the circuit is live or dead using a plug-in tester or lamp. But distinguishing between a failed breaker and a downstream wiring fault requires a multimeter continuity or voltage test.
How Do I Know If a Breaker Is Tripped or Failed?
A tripped breaker handle sits in a middle position between ON and OFF. A failed breaker often looks completely normal — handle in the ON position — but reads no output voltage or shows no continuity when tested. Position alone is not a reliable indicator.
What Is a Continuity Test on a Circuit Breaker?
A continuity test checks whether an unbroken electrical path exists through the breaker’s internal contact. When the breaker is ON and the contact is intact, current can flow — the multimeter beeps or reads near-zero ohms. When the contact has failed, no path exists and the meter reads open (infinite resistance).
Need a Reliable Replacement Breaker?
Dvolt manufactures MCBs and circuit protection components built to consistent tolerances for residential and commercial electrical panels.
Contact Our Team Browse Our MCBsFinal Thoughts
Testing a circuit breaker without power using the continuity method is the safest way to confirm whether the internal contact is functional — and it requires nothing more than a basic multimeter. The live voltage test adds confirmation that the breaker is delivering power under real operating conditions. Together, these tests tell you definitively whether you’re dealing with a bad breaker or a fault further down the circuit — which is exactly what you need to know before pulling a breaker or tracing wiring that isn’t the problem.